Field note 004 · Water & air
Size the air path, then verify the root zone.
A pump label describes the machine under stated conditions. The crop receives whatever oxygen survives the depth, tubing, valves, diffusers, temperature and biological demand of the installed system.
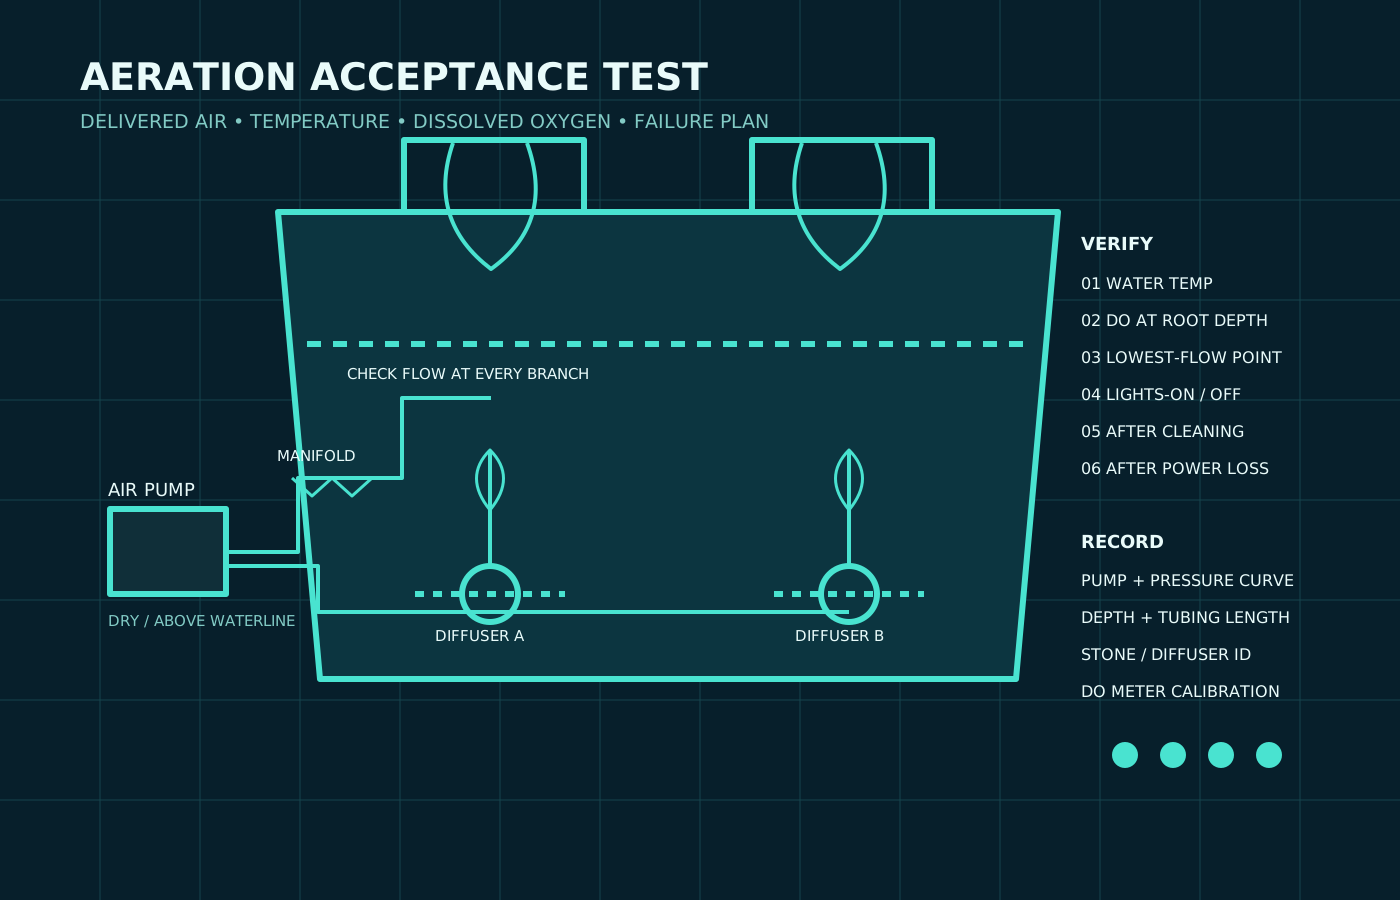
Search for “hydroponic air pump size” and you will find tidy rules that assign a fixed number of liters per minute to each gallon of reservoir. Those rules are easy to repeat and hard to verify. They often omit the pressure at which the pump can deliver that flow, the depth of the diffuser, the resistance of stones and valves, the distribution across a manifold, and the oxygen demand of the actual root zone.
A better purchasing question is not “What pump matches this many gallons?” It is “What oxygen pathway does this system require, what airflow can this pump deliver at the installed pressure, and how will I prove the root zone remains adequately oxygenated through the warmest and most demanding part of the cycle?” This guide builds that acceptance test.
Use equipment listed and rated for the location, follow every manufacturer instruction, keep plugs and controls away from splashes, use GFCI protection where equipment is near water, and never handle energized equipment while wet or standing in water. Have damaged or wetted electrical equipment inspected by a qualified person before reuse.
1. Name the system duty before choosing a pump
Air does different work in different hydroponic systems. In deep water culture, roots remain submerged and depend heavily on oxygen dissolved in the nutrient solution. Oregon State University Extension describes effective aeration as a requirement because DWC has relatively little water movement and air exchange. University of New Hampshire Extension likewise calls aeration critical for stationary raft systems.
Nutrient-film technique is different. Missouri Extension explains that a correctly operating shallow film exposes roots to air and allows oxygen to diffuse into the moving solution. Ebb-and-flow roots also receive air as the root zone drains. Drip systems, aeroponics and recirculating layouts each create their own combination of wet time, air exposure, agitation and failure risk.
Classify the duty on paper:
- Root exposure: fully submerged, intermittently flooded, thin-film, misted, or media-supported.
- Water path: one container, several linked modules, a remote reservoir, or a reservoir plus grow bed.
- Plant load: crop, stage, root mass, planting density and expected harvest date.
- Operating window: normal and warmest solution temperature, photoperiod, pump schedule and room conditions.
- Existing gas exchange: waterfall return, venturi, exposed film, surface agitation, circulation and headspace.
- Consequence of interruption: how quickly roots lose water, flow or aeration when power or one component fails.
This prevents two opposite mistakes: adding an air stone to every reservoir without asking what it solves, or treating visible circulation as proof that submerged roots have enough dissolved oxygen.
2. Retire the gallons-only sizing rule
Reservoir volume matters because it affects thermal stability, nutrient dilution and the amount of water being managed. It does not determine oxygen demand by itself. A lightly rooted cool reservoir and a dense, warm DWC bed of the same volume do not present the same load.
Pump output also changes after installation. An air pump must create enough pressure to push gas below the water surface and through every restriction. Greater diffuser depth adds backpressure. Long narrow tubing, elbows, check valves, manifolds and clogged diffusers add more. If one branch has less resistance, it may take most of the flow while the farthest branch weakens.
That is why a pump’s maximum open-flow number is not the same as delivered airflow in the reservoir. Maximum flow may be measured with little or no pressure. Maximum pressure may occur at little or no flow. The useful point lies on the performance curve between those limits.
Use a volume-based rule only as a rough screening tool when comparing candidates. Do not publish it as proof of performance. The installed system still needs a commissioning check at operating depth, with the intended tubing, valves, diffusers, water temperature and crop load.
3. Read the specifications that survive installation
A useful pump brief connects the advertised machine to the actual air path. Ask for current maker documentation and record the test conditions behind each number.
| Specification | What it helps answer | What remains to verify |
|---|---|---|
| Airflow curve by pressure | Estimated delivered flow at the planned diffuser depth and line resistance | Actual distribution and dissolved oxygen after installation |
| Maximum pressure | Whether the pump can overcome static depth and restrictions | Operating flow; maximum pressure is not a normal flow rating |
| Continuous-duty rating | Whether the maker allows the intended run schedule | Ventilation, ambient limit, noise and service interval |
| Outlet and manifold details | Tubing size, port count, adjustment and connection method | Branch balance at the reservoir |
| Power draw | Operating cost and backup-power load | Measured watts at the chosen operating point |
| Service parts | Whether diaphragms, filters, seals and diffusers can be replaced | Availability from an authorized source and repair procedure |
| Environmental and electrical rating | Where the pump and controls may be installed | Compliance with the actual wet or damp location and local requirements |
Do not infer a rating from a similar model, a marketplace title or a reseller comparison chart. Match the exact model and voltage. If the maker provides only “maximum L/min” with no pressure curve, treat the missing curve as uncertainty and leave more room for verification or choose a product with better documentation.
Noise claims also need test conditions. A pump may sound quiet on a bench and become loud when vibration transfers into a shelf, lid or wall. Include isolating feet, tubing strain relief and mounting position in the acceptance test instead of trusting one decibel number without distance and environment.
4. Lay out delivery so every branch can be checked
Place the pump in the dry location allowed by its instructions, with adequate ventilation and access for filter and diaphragm service. Protect the electrical connection from splashes and arrange cords so water cannot run toward a plug. OSHA advises GFCI protection in damp locations and warns against operating electrical equipment while standing in water.
Prevent water from siphoning back toward the pump. The correct arrangement depends on the product: some instructions call for mounting the pump above the waterline; others specify a compatible check valve and orientation. Follow the pump and valve instructions rather than improvising. A check valve is a service item, not a permanent promise.
- Draw the pump, manifold, every branch, valve, diffuser and reservoir before cutting tubing.
- Keep branch lengths and routing comparable where practical; label both ends.
- Use tubing and fittings sized for the documented pump and manifold.
- Put diffusers where their rising bubbles and induced water movement reach the root zone without pushing roots into drains or intakes.
- Secure diffusers so they cannot flip, float or migrate.
- Open valves and confirm visible output at every branch before plants conceal the layout.
- Record depth, tubing length, valve position, diffuser type and pump setting.
Bubble size is not a complete efficiency score. Smaller bubbles can add contact area, but a highly restrictive or fouled diffuser may reduce total delivered air. Surface agitation and water circulation also affect gas exchange. Judge the assembled system by distribution and measured root-zone conditions.
5. Verify water temperature and dissolved oxygen together
Missouri Extension’s 2026 nutrient-solution guide says dissolved oxygen above 6 ppm is optimum for hydroponic production and emphasizes that warmer water holds less oxygen. South Dakota State University Extension gives a general 5–8 mg/L range for many hydroponic systems. Virginia Cooperative Extension reports 7–10 ppm as an optimal target in its edible-crop comparison and identifies 4 ppm as a minimum. These figures come from different production contexts, so use the crop program and Extension guidance that match your system rather than averaging them into a universal set point.
Temperature sets a physical ceiling. Missouri Extension illustrates the limit with warm, conductive solution: at 35°C and 5 dS/m, oxygen solubility is 6.85 ppm no matter how much air is pumped. More bubbling cannot compensate indefinitely for an overheated reservoir. If dissolved oxygen falls as water warms, address the heat source, reservoir exposure, room conditions and pump heat as well as aeration.
Use a dissolved-oxygen meter that fits the required accuracy and maintenance burden. Follow its manual for sensor preparation, calibration, temperature compensation, pressure or altitude correction, salinity or conductivity correction, storage and membrane or cap replacement. The U.S. Geological Survey’s dissolved-oxygen field manual stresses manufacturer-specific calibration and stable temperature. EPA guidance warns that bubbles collecting on a probe can create erroneous readings.
Map the system instead of taking one convenient reading:
- Calibrate and document the meter immediately before the test as its instructions require.
- Record water temperature, EC, reservoir volume, plant load, light state and time.
- Measure away from the direct bubble plume unless the meter instructions say otherwise.
- Check the reservoir, the densest root zone, the farthest or lowest-flow module and the return.
- Repeat near the expected warmest part of the light cycle and after lights have been off.
- Repeat after cleaning, changing diffusers, adjusting valves or adding plant capacity.
- Log the lowest reading and its location, not only the best reading.
Connect this map to the seven-day reservoir log. Temperature, EC, solution volume, root appearance, pump events and dissolved oxygen belong on the same timeline. That record helps separate a delivery failure from heat, meter drift, changing crop demand or a broader root-zone problem.
6. Build a failure plan before the crop depends on it
Aeration systems fail in parts. Power goes out; a diaphragm weakens; a filter clogs; a hose kinks; a manifold valve shifts; a check valve sticks; a stone fouls; one reservoir warms; roots surround a diffuser. A spare pump on a shelf does not cover every one of those failures.
List the observable signal for each failure and the first safe action. A no-flow indicator, audible change, current alarm, temperature alert or DO alarm may shorten discovery time, but every alarm must be tested. Put the inspection route on the operating log: pump sound and heat, branch output, tubing, connections, stones, water temperature, DO trend and roots.
For backup power, total the measured watts of the air pump and any circulation equipment that must continue. Check the backup manufacturer’s continuous output, startup capability, permitted environment, battery chemistry, charging instructions and runtime method. Test the actual load on a planned schedule. Never run a fuel-burning generator indoors, in a garage or near openings; follow current public-safety guidance and the generator manual.
Write the response in stages: what keeps running automatically, who receives an alert, how long the verified reserve lasts, what can be moved to another aerated reservoir, and when crop safety or electrical conditions require abandoning the intervention. System type matters: Missouri Extension notes that DWC plants do not wilt immediately when aeration stops, while pump failure in other layouts can deprive roots of water quickly. That resilience is time to respond, not permission to ignore the outage.
7. Troubleshoot evidence, not root color alone
Brown roots, odor, slowed growth and leaf symptoms deserve attention, but they do not identify one cause. Nutrient products can stain roots. Light leaks can support algae. Temperature, fertilizer balance, pH, salinity, sanitation, pathogens, chemical injury and low dissolved oxygen can overlap.
When a system changes, preserve evidence before dosing or replacing everything. Confirm meter calibration; record temperature and DO at multiple points; inspect each air branch; compare pump sound and output to the baseline; review the light-map log for heat-producing changes; inspect roots, solution, intakes and returns; and review every recent addition. Seek appropriate Extension or laboratory support when symptoms persist or food-crop safety is uncertain.
The 30-minute aeration acceptance test
- Name the duty. Record system type, crop, plant count, root exposure, operating volume and warmest expected solution temperature.
- Trace the air path. Mark pump, manifold, branch lengths, valves, check valves, depth and diffuser locations.
- Verify documentation. Save the exact-model airflow curve, continuous-duty statement, electrical rating, power draw, service parts and manual.
- Start and inspect. Confirm stable operation, ventilation, dry electrical connections and visible delivery at every branch.
- Calibrate the meter. Follow the DO meter procedure and log temperature, pressure or altitude, conductivity correction and calibration result.
- Map DO and temperature. Measure the reservoir, root zone, farthest module and return without holding the probe in a bubble stream.
- Challenge the system. Repeat during the warmest operating period and after the plant load or diffuser condition changes.
- Test failure response. Simulate the permitted alarm and backup sequence without creating an electrical or crop hazard; record actual runtime and recovery.
- Set service triggers. Define the DO, temperature, flow, noise, pressure or time threshold that prompts inspection and the parts kept on hand.
Hydro Grow Hub keeps branded listings, prices, inventory, availability and checkout disabled until supplier authorization and current commercial terms are documented. An air-system listing must state exact-model performance at useful pressure, installation limits, electrical and environmental ratings, service parts and test conditions. “Four outlets” or “for 100 gallons” is not enough.