Field note 005 · Clean + reset
Clean the grow loop before the next roots arrive.
A reservoir change is not a system cleanout. Between crops, move through six distinct stations: drain, disassemble, wash, rinse, sanitize, and recommission.
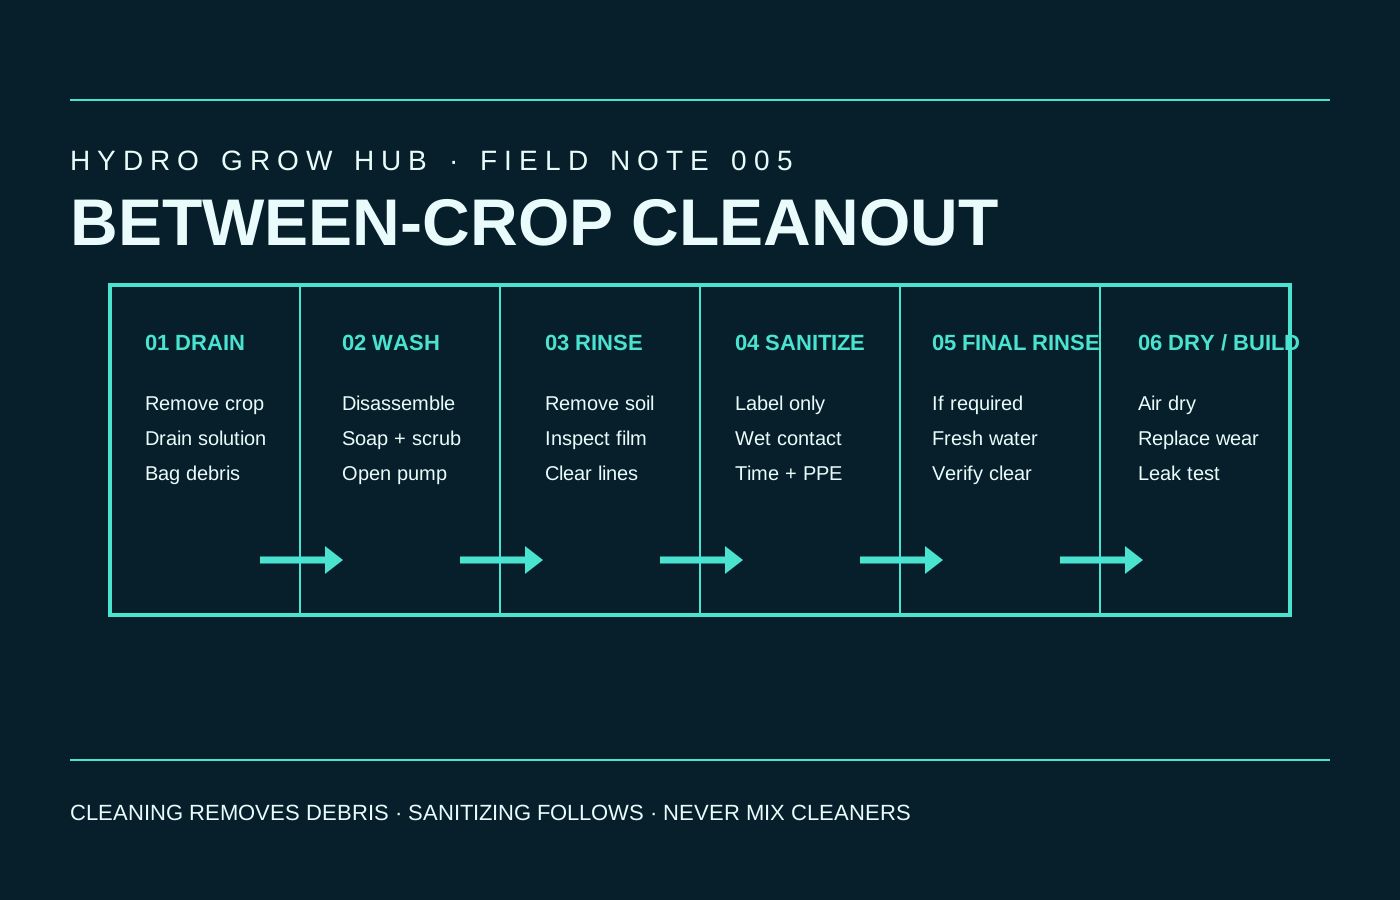
Hydroponic cleaning advice often begins with a chemical. The more useful starting point is access. Can the reservoir be fully drained? Can the pump cover come off? Can the channels, return, manifold, emitters, net pots, air lines, and diffusers be reached without destroying them? A system that cannot be inspected is difficult to clean consistently, no matter what product is poured into it.
University of Minnesota Extension recommends cleaning reservoirs, trays, and pumps between growing cycles. Its sequence starts with removing plant debris, then scrubbing with warm water and dish soap, rinsing, and only then sanitizing. Oklahoma State University Extension likewise recommends sanitation of irrigation tanks, emitters, hydroponic media, rafts, and trays between crops to reduce algae carryover.
CDC warns that mixing bleach with cleaners or other disinfectants can release dangerous vapors. Read the entire label, provide the specified ventilation and protective equipment, use only on compatible surfaces, and keep plants, nutrient concentrate, acids, ammonia products, people, and pets out of the cleanout zone.
Cleaning and sanitizing are two different jobs
Cleaning removes roots, leaves, mineral scale, nutrient residue, dust, algae, and attached film. Sanitizing is a later treatment intended to reduce microorganisms on a surface that is already clean enough for the product to work as directed. Skipping the wash step leaves organic matter and deposits that can shield surfaces and consume some sanitizers.
Drain, disassemble, remove solids, wash with detergent and mechanical action, then rinse away loosened soil.
Look for film, scale, blocked passages, worn seals, light leaks, rough surfaces, cracks, and dead legs.
Use a product whose label covers the intended surface and use, with its concentration, contact time, PPE, and rinse directions.
Reassemble, run a fresh-water leak test, confirm flow at every outlet, and record the baseline before adding nutrients.
A clear-looking reservoir can still carry deposits in the pump housing or film inside a return line. Conversely, stain alone does not prove a live disease problem. The goal is not a sterile-looking photograph. The goal is a repeatable process that removes crop residue, reaches wetted surfaces, follows a valid sanitizer label, and produces a verified operating baseline.
Map every wetted part before harvest
Plan the cleanout while the system is still assembled. Photograph the tubing route and label both ends of every line. Record valve positions, pump orientation, emitter placement, air-stone locations, and which seals or gaskets belong to each fitting. Save the exact manuals for the pump, chiller, meter probes, valves, grow channels, and reservoir.
Divide parts into four groups:
- Food-contact and solution-contact surfaces: reservoir, lid, trays, channels, buckets, rafts, manifolds, return fittings, tubing, emitters, net cups, and tools.
- Serviceable equipment: pump housing, impeller, strainers, filters, air diffusers, check valves, and removable probes.
- Parts with special care: pH, EC, and dissolved-oxygen probes; porous media; elastomers; adhesives; and components with limited chemical compatibility.
- Electrical equipment: plugs, drivers, controllers, pump bodies, fans, and connectors that must remain dry or be handled only as the manufacturer permits.
This inventory turns “clean the system” into a finite job. It also reveals disposable or inaccessible parts before the crop is removed. Keep replacements for brittle tubing, cracked grommets, swollen seals, clogged emitters, worn pump bushings, and any single-use component identified by the maker.
Drain the crop loop without spreading the problem
Disconnect power using the equipment instructions before hands or tools enter the wet zone. Do not handle energized plugs or equipment while wet or standing on a wet floor. Remove plants and roots without dragging them across clean benches or new starts. Bag diseased or suspect material according to local disposal guidance rather than moving it through other growing areas.
- Record the closing state. Note crop, date, reservoir temperature, pH, EC, odor, visible film, algae, root condition, blocked outlets, and any disease concern.
- Remove nutrient solution responsibly. Follow local rules and Extension advice; do not assume concentrated nutrient solution belongs in a storm drain or surface water.
- Capture solids. Remove roots and plant fragments before they enter a floor drain, pump, or reusable cleaning water.
- Open the lowest points. Drain sumps, return elbows, manifolds, filters, chillers, and tubing loops that trap solution.
- Keep dirty parts together. Move them on a washable tray to prevent residue from crossing into seedling or harvest areas.
- Label disconnected lines. Preserve direction of flow and component position for the later leak test.
If disease is suspected, separate tools and containers used on that system until the cause and sanitation plan are resolved. Do not move pumps, net pots, or brushes to a healthy system because they look clean.
Wash with friction, access, and enough rinse water
Start dry where practical: lift out roots, scrape removable deposits with a surface-safe tool, and vacuum or collect loose debris. University of Minnesota Extension then recommends warm water, dish soap, and scrubbing for reservoirs, trays, and pump exteriors, followed by a thorough rinse.
Mechanical action matters because biofilm attaches to surfaces. Use dedicated brushes sized for corners, tubing, pump cavities, and channel profiles. A long brush that reaches only halfway through a line creates a clean entrance and an unknown center. Replace tubing that cannot be accessed, verified, or economically cleaned.
| Component | Open and inspect | Replace or redesign when |
|---|---|---|
| Reservoir and lid | Corners, seams, bulkheads, underside, light gaps, level marks | Cracks, permanent rough film, inaccessible voids, or uncontrolled light entry remain |
| Water pump | Intake, strainer, impeller chamber, shaft, cover, cord entry | Housing is damaged, impeller is worn, or maker forbids needed disassembly |
| Tubing and manifold | Ends, valves, barbs, low points, opaque and transparent sections | Film or scale cannot be removed and verified through the full length |
| Emitters | Orifice, screen, pressure-compensating parts if serviceable | Flow remains uneven after the approved cleaning procedure |
| Air system | Diffusers, check valves, manifolds, filter, tubing connections | Flow remains weak or a porous diffuser cannot be restored consistently |
| Probes | Bulb, junction, cap, cable, storage solution condition | Cleaning, storage, or calibration response fails the exact manual |
Do not scrub a pH or dissolved-oxygen sensor as if it were reservoir plastic. Probe glass, membranes, caps, junctions, and storage solutions have manufacturer-specific procedures. Keep those components in a separate labeled tray and follow their manuals.
Choose one compatible sanitizer and follow its label
After washing and rinsing, choose a sanitizer whose current label covers the intended use site and materials. EPA states that users must read the label to confirm a registered product is approved for the surface or use and must keep surfaces visibly wet for the listed contact time. More product or a longer improvised soak is not automatically more effective and may damage parts.
University of Minnesota Extension describes a bleach treatment for cleaned NFT systems using regular unscented bleach of a specified sodium-hypochlorite range, followed by a fresh-water rinse cycle. It also lists peroxide/peroxyacetic-acid products whose labels indicate suitability for food-contact surfaces. Household bleach strengths and formulations vary, so do not transplant an old internet ratio onto an unknown bottle. Match the current product concentration, the Extension procedure, the system volume, and the product label.
- Confirm the active ingredient and concentration on the original container.
- Confirm the intended use, compatible materials, dilution, contact time, ventilation, PPE, and final-rinse requirements.
- Use clean measuring equipment dedicated to the product; do not estimate by capfuls.
- Circulate only if the sanitizer label and equipment manuals permit it.
- Make sure every target surface remains in contact for the required time without exceeding component limits.
- Complete the specified drain and rinse process before another chemical, nutrient, acid, base, plant, or biological input enters the system.
- Never mix sanitizer residues or add one product to “boost” another.
Bleach can corrode some metals and damage fabrics or other materials. Peroxide and peroxyacetic products also have concentration, exposure, compatibility, and PPE limits. “Food contact” does not mean safe to improvise. The label and system manual control.
Treat pumps, tubing, and emitters as separate service jobs
Circulating a cleaning solution through an assembled loop can contact internal surfaces, but circulation does not prove that a blocked branch received enough flow or that attached debris released. Disassemble serviceable pump parts first, scrub the exterior and accessible housing as the manual allows, rinse, and then include the reassembled pump in the compatible sanitation process.
For irrigation branches, compare discharge rather than watching for any drip. Before sanitizing, run clean water and collect each outlet for the same timed interval in identical containers. A low branch may indicate roots, scale, film, a pinched line, a valve error, or pump wear. After cleaning and recommissioning, repeat the test. The improvement is evidence that flow paths were restored.
Air stones and porous diffusers can hold deposits inside pores that are difficult to inspect. Follow the exact maker’s cleaning and replacement instructions. A stone that bubbles unevenly after service can undermine the aeration acceptance test, even when the reservoir itself is clean.
Design away recurring trouble. Short removable tubing, union fittings, cleanout ports, accessible low-point drains, strainers, opaque reservoirs, removable lids, and spare manifolds reduce the labor required for the next crop. Avoid decorative complexity that adds dead legs or cavities without adding useful system function.
Recommission with water before nutrients
Allow parts to dry if the chosen procedure and material instructions call for it. Reassemble against the system map, install approved replacement seals and wear parts, and support tubing so it cannot kink or pull on a bulkhead. Keep the electrical zone dry and restore power only after visual inspection.
- Fill with clean water. Use enough volume to operate every pump, branch, return, and sensor safely.
- Run a leak test. Inspect bulkheads, lids, pump covers, hose barbs, unions, valves, and low points while dry surfaces make drips visible.
- Verify circulation. Confirm return flow, emitter output, drain behavior, surface level, and air delivery at every branch.
- Measure the baseline. Record source-water temperature, pH, EC, and volume using cleaned and calibrated meters.
- Resolve rinse requirements. If the sanitizer label or Extension procedure calls for a final rinse, complete it and drain as directed.
- Add nutrients only after acceptance. Mixing concentrate into a leaking or uneven loop turns a repair test into waste.
Restart the seven-day reservoir log with the clean system’s baseline. Note every new component and the date. When pH, EC, temperature, volume, dissolved oxygen, or flow begins to drift, the closeout record provides a reference.
Keep one page that the next cleanout can improve
Crop · harvest date · symptoms · temperature · pH · EC · solution volume
Reservoir · pump · tubing · emitters · air system · channels · probes
Product · active ingredient · label rate · contact time · PPE · rinse completed
Leak test · branch flow · return · aeration · meter baseline · operator/date
Photograph hard-to-reach areas before and after cleaning. Record parts that consumed the most time, could not be verified, or needed replacement. Use that list when evaluating the next reservoir, pump, manifold, or system layout.
A useful product brief should state whether a reservoir fully drains, whether the pump and channels can be opened, which materials contact solution, how seals and tubing are replaced, and which cleaning agents the maker allows. Hydro Grow Hub keeps branded listings, prices, inventory, availability, and checkout disabled until supplier authorization and current commercial terms are documented.
Frequently asked questions
Should a system be cleaned between crops?
Yes. Extension guidance recommends removing debris, washing, rinsing, and sanitizing reservoirs, trays, pumps, and other components between plantings or crop cycles.
Does a reservoir change count as cleaning?
No. Draining and refilling changes the solution but does not remove attached film, roots, deposits, or debris inside pumps, lines, valves, channels, and emitters.
Can I mix bleach with a detergent or acid to clean faster?
No. Never mix bleach or disinfectants with other cleaners. Complete one labeled process, including required rinsing, before another product enters the system.
How can I tell whether tubing is clean?
Inspect the full accessible length, use a compatible mechanical-cleaning method, and compare equal-time flow from each outlet before and after service. Replace a line when its interior cannot be reached or verified.